Ninox Review
 I've now been working with Ninox for a while and it's time to do a proper review - taking some examples from tour HR app, KasPer Pro, as we go.
Introduction
As discussed in my previous article, Ninox is a Cloud/Mac/iOS/Android database designed with users in mind - to give subject experts the tools they need to create their own solutions. This is an objective which it meets well - with the proviso that you still need to learn how a relational database works in principle to make the most of it (just like every other database platform).
When I come across a new platform like Ninox, my first reaction is usually to see if it's possible to handle some of the tricky date calculations and manipulations needed to manage employees' absences (I know, it's sad!). By this I mean checking date ranges against working patterns and public holidays - and then creating a record for each day of the absence so that you can correctly report on absences with any range of dates. This always requires some form of scripting language and I've found Ninox's NX language well up to the task.
But before we get into the more complex issues let's take a look at building some of the more straightforward elements of the application.
Creating our First Table (Departments)
This is a good place to start when building an HR system because many of the subsequent tables are going to 'link' to it (for example, Jobs are in a department). In this example, we are only going to input one piece of information about the department - the Name - all the other fields are then set up as calculations (headcount etc) or display's of related records (Jobs).
In Ninox, you add or change the organisation of the database by entering Admin mode (generally by clicking the Spanner icon top right). Once in Admin, options are available which let you see and change the configuration of you tables and fields and their associated screen layouts. For example if you are looking at a department and in a particular record you simply select Edit Fields: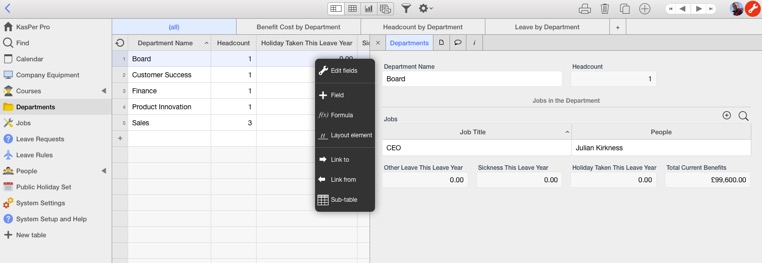
You can then see the details of the Table and all it's fields: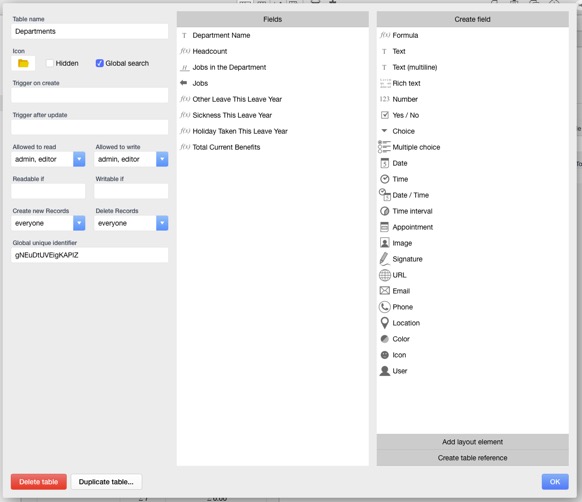
From where you can see further details of your field by simply clicking on it: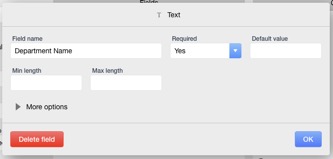
If you look further at the overall Table definition screen above you'll see how there are quite a few options which relate to the table itself (who can add, edit and read records for example) as well as the option to define scripts (code) which will run when a record is added or updated.
The main part of this screen, though, is the area where new fields (be they input of one type or another or formulae) and also where you can add headings and other 'layout elements' to your table. It provides a great deal of flexibility and scope.
Our First Join - Adding the Jobs Table
Within an organisation (and therefore an HR app), Jobs tend to be organised into Departments (or similar). We are going to reflect this real world 'relationship' with a 'Join' or 'reference' within our database. It is this capability that gives rise to the term Relational Database and it is their ability to reflect real word connections between things that makes them so powerful.
So, within an HR app, any Jobs table will be related to departments and then, in turn, employee's data will be related to Jobs (etc). For Jobs, we need to create fields for Job Title, Job Description, a status to show it's 'current', and a link to its department. We end up with something like:
You'll notice that there are several fields in here that I didn't mention such as people and subordinates - these are going to show tables of related information on the screen. The latter subordinates field is interesting in that the system works it out based on a relationship between one Job and another shown above as the Reports To field. This is what is called a 'Self Join' in that the table relates to itself. Within an HR application this enables us to create the hierarchy within the organisation. The table above looks like this in live view: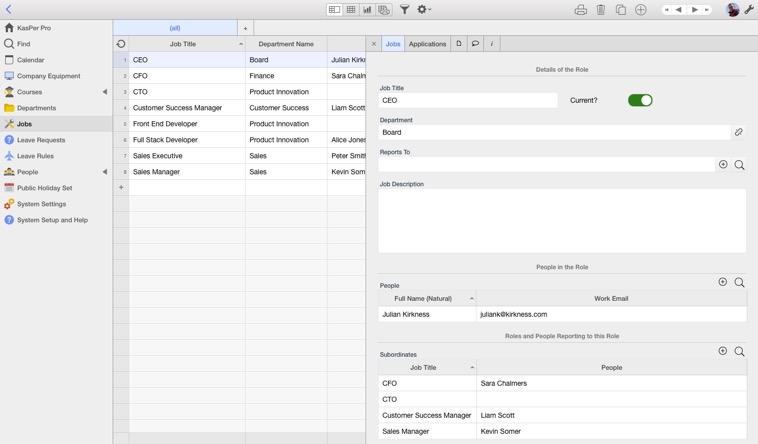
As this is a review rather than a guide, I'm not going to go through the creation of all the tables and fields in the application. However, I hope you can see that you have a lot of choices when it comes to creating your tables - and the screen layout that accompanies each with 'layout elements'. It's possible to build an attractive user interface with Ninox and the framework within which the tables are presented makes for a highly usable solution.
Other tables in KasPer Pro app include:
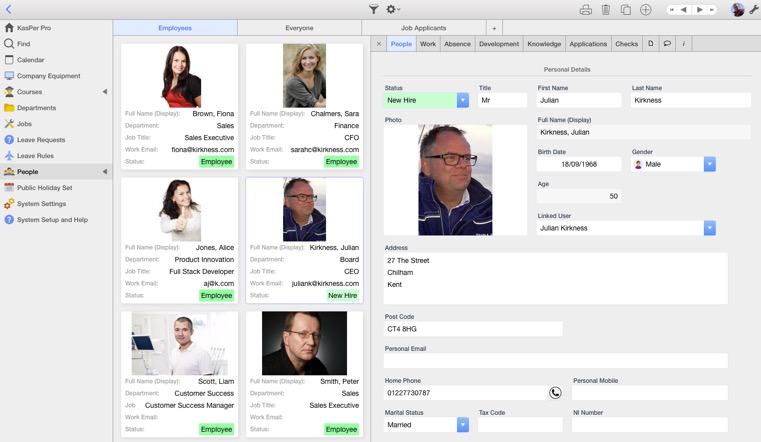
People
Benefits
Absences
Absence Days
Leave Requests
Leave Rules
Leave Accruals
Training Records
Courses
Course Events
Appraisal Types
Appraisals
Skills and Competencies
Company Equipment
Public Holiday Sets
Etc
Calculations and Code (the NX Language)
At the beginning of this article I briefly mentioned the NX language which is core to Ninox's flexibility. I hope that stressing this doesn't put anyone off - because NX is often just used in a simple way to perform a calculation (like in a spreadsheet) such as:
age('Birth Date')
In a formula field this will display a person's age - simple right?
The great thing I've found about NX is that it's learning curve is very 'gentle' - before long you find yourself doing conditional logic (if…then) and many people will progress to performing fairly complex logic. Personally, I feel this is the holy grail when it comes to end user oriented databases - and a similar approach was, in my opinion, responsible for the huge success, over the years, of Microsoft Access. I think Ninox have done a great job here!
Some Examples:
The following conditional statement calculates a field called Current Annual Value for a benefit (e.g. a salary) based in whether it's Current or not:
if Current = "Yes" then 'Annual Amount' else 0 end
Going up a notch in complexity, the following couple of lines work out an employee's length of service - taking into account whether there is a leaving date, when it will calculate up to the leaving date instead of the current date:
if 'Start Date' <= today() then
if 'Leaving Date' > today() or 'Leaving Date' = null then
today() - 'Start Date'
else
'Leaving Date' - 'Start Date'
end
end
Suffice it to say that I've been able to implement full leave calculations in the KasPer Pro HR app - which involves significant logic yet was achieved in only about 20 lines of script (which is extraordinary). I'm very impressed with how 'compact' the language is.
Reporting
Ninox has the capability to produce PDF reports (many per table) which you have significant control over - and, helpfully, it all starts with Ninox creating a usable default automatically. As an example, KasPer Pro includes an Absence Summary report for employees which looks like this:
Charting and Other Views
You have the option to embed charts with forms and to create chart views for tables - along with Card, Kanban, Gantt and Form views: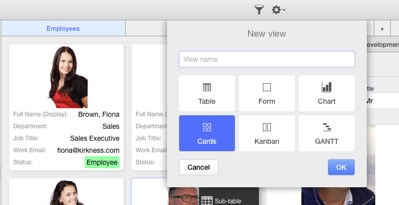
(You can see a Card view in the background here)
With Charts, you have a wide range of formats available - here's an example of a bar chart: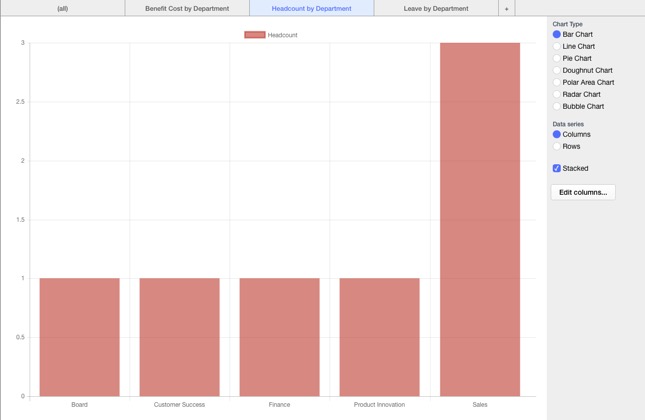
And to define these is very straightforward: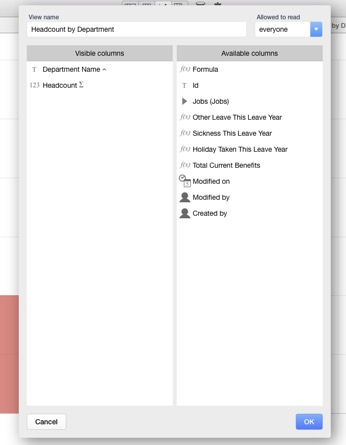
In this example, the Headcount field is a Sum field which references the employee's start and leave date to determine if they are a current employee etc.
As I mentioned above, charts can also be embedded in forms - here is what the finished Department screen looks like with two charts:
Using this embedded charts feature combined with embedding tables etc., it's possible to build good looking 'Dashboards' with Ninox.
Calendar
Unusually, Ninox has a single calendar view for the whole application (I'd like to see Calendar views for specific tables eventually) - but you can select which fields will be displayed on the calendar and what colour the calendar entries will be. From the calendar you can click through to the details of the event.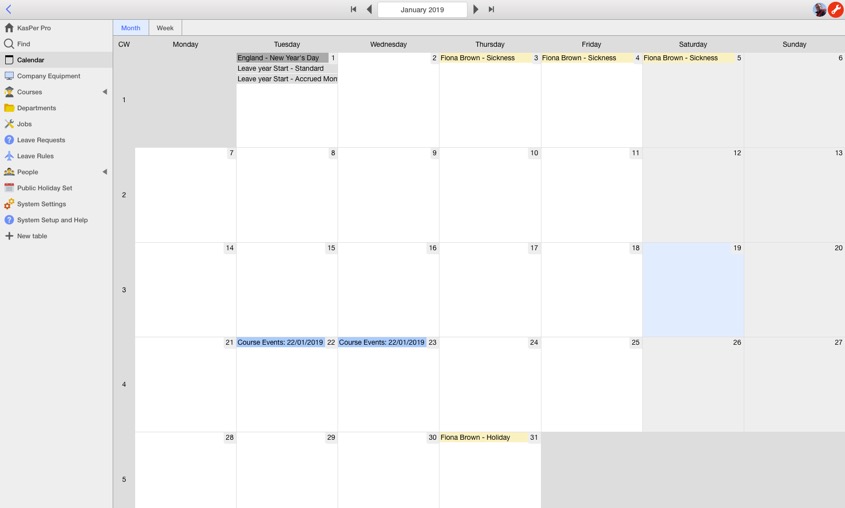
Workflow and Connectivity
Ninox includes the ability to email users and/or email addresses held in the database so it's quite possible to build simple workflows into your app natively. It can also connect to Zapier which potentially extends connectivity to literally thousands of other web applications.
Platforms
I have mainly used the Cloud version of Ninox so far - but it is also available as a native Mac, iOS and Android application - and the 'apps' can be connected to the your cloud databases. This means that you can realistically build mobile friendly apps which can use the sensors in your device (to read barcodes for example).
Security
This seems pretty good - for example in KasPer pro, you can use an Employee Access rights group which will limit the user to requesting leave and updating only the most basic personal information. There is also a 'Protected' mode with which you can add a password so that admin users would need to enter the password before being able to customise anything (i.e. another 'layer' of security).
What I Would Like to See Added
Nothing's perfect and the main additional feature I'd like to see in Ninox is probably webforms (i.e. the ability to create forms which NON USERS can user to add data). A typical use-case for this would be for an enquiry form embedded on your website. It is possible to achieve something functionally similar using a form tool like Cognito forms and Zapier however.
Pricing
Unlike the other Cloud Database platforms I've reviewed, Ninox is available as either a Cloud solution or a standalone app on iPhone, iPad and Mac so the pricing has several options: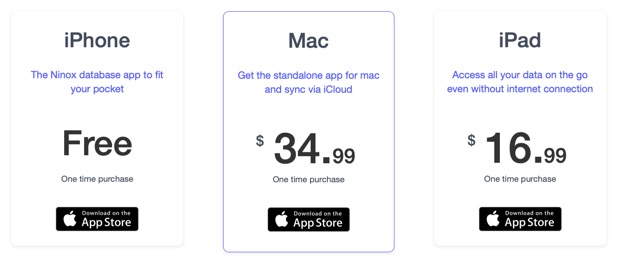
In the cloud, the pricing is a reasonable $8.33 a month - but remember you'll pay for a year in advance - and unusually you can have your own private cloud.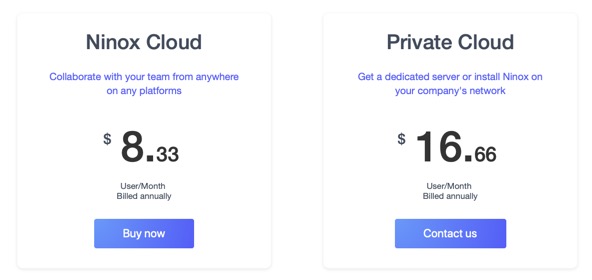
Support and Community
Ninox has a very unusual approach to supporting customer which I find very refreshing. There are weekly webinars which anyone can join (for example English language at 5pm (UK time) every Tuesday) attended by a range of customers and several Ninox staff. These usually start with some sharing of information from Ninox followed by questions and answers from users. It's a very interactive format and you'll usually pick up tips you may never otherwise learn!
Also offered are email and telephone support plus one to one online meetings!
Summary
Overall, I've found Ninox to be a really excellent platform - in terms of comparison with my other favourite platforms, Knack and Airtable, Ninox excels in terms of its language (there is no equivalent in Airtable and in Knack you have to use Javascript which is much harder to learn as you need to learn their API). This makes it highly suitable for automating processes and performing complex tasks which simply isn't possible with the other two. On the other hand, Knack has an advantage when it comes to setting up features for public access or where you need different data presentations for different users - and I would use Airtable where there was more of an adhoc requirement or integration with Slack and collaboration in general was more important.
I was so impressed with Ninox that I quickly applied to join the Ninox Partner Program and am now offering both two Ninox apps (this app, KasPer Pro and also a CRM, KasCur Pro). Both are available as free downloads (free versions are limited by the number of records and/or 'Protected' so that they cannot be modified) - an upgrade to the full version is readily available also at a reasonable cost.
If you'd like to find out more about Ninox please click here.